Have you ever dreamed of playing your favorite Android games or using your go-to Android apps on a larger screen like your PC or laptop? The wait is over! Today, we’ll walk you through how to install and use Google’s official Android emulator, Google Play Games, to run Android apps and games directly on your computer. Whether you’re a gamer or just someone looking to use Android apps on a bigger screen, this tutorial has got you covered. Let’s get started!
Step 1: Enable Virtualization on Your PC
Before we dive into downloading the emulator, it’s important to ensure your PC is ready to handle Android apps smoothly. To do this, you need to enable virtualization features on your computer.
- Open the Windows Features page on your PC.
- Check the boxes for Virtual Machine Platform and Windows Hypervisor Platform.
- After enabling these, restart your computer to apply the changes.
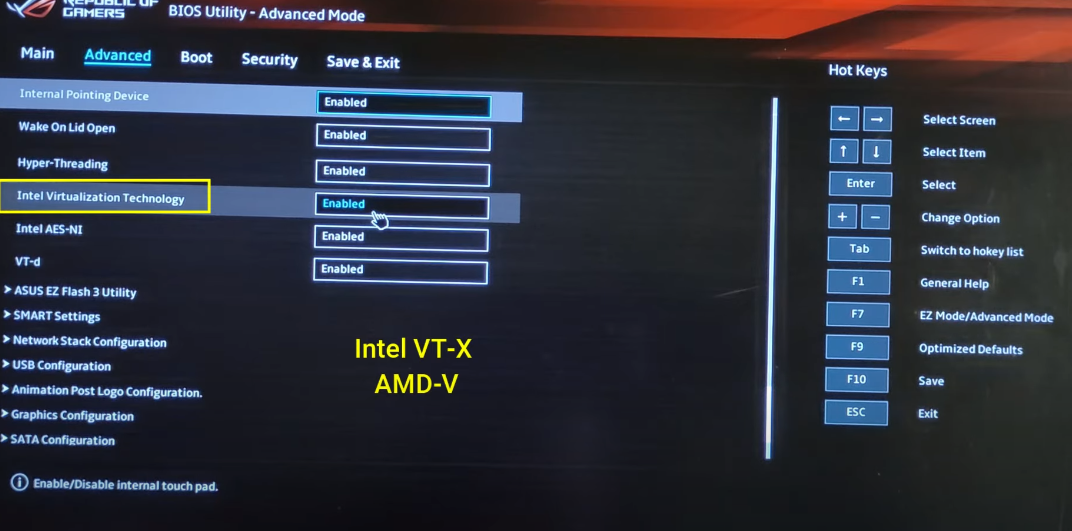
If you’re using a newer PC, make sure that virtualization is also enabled in your BIOS or UEFI settings. Look for settings like Intel VT-x or AMD-V, depending on your processor. Once this is done, your system will be ready to run Android apps with optimal performance.
Step 2: Download the Google Play Games Emulator
Now it’s time to download the Google Play Games emulator to your PC. This emulator is specifically designed to bring the Android experience to your desktop.
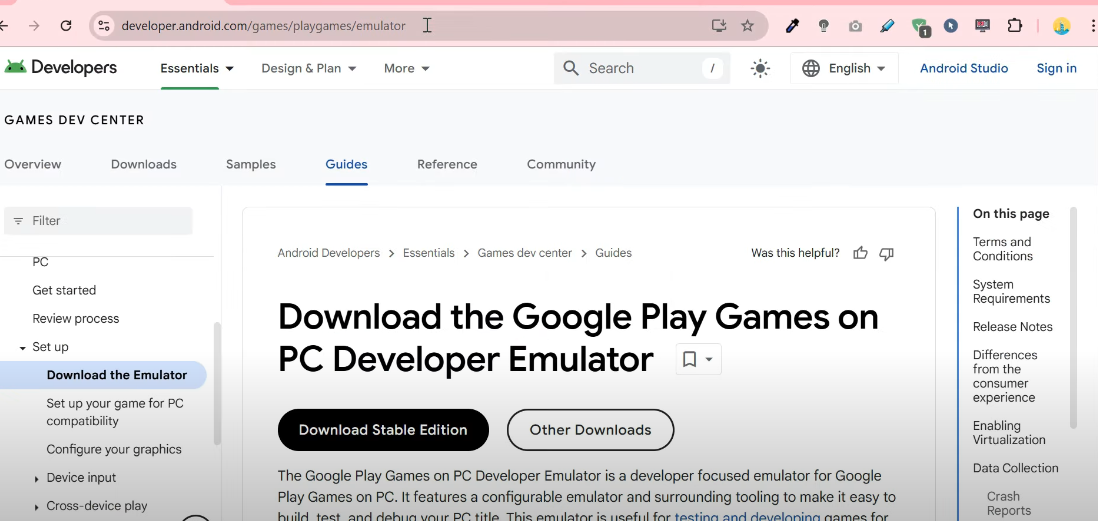
- Open your web browser and go to the official download link provided in the video description.
- On the website, click on the Download Stable Edition button to begin the download.
- After the download is complete, double-click the installer to run the setup. Follow the on-screen instructions to install the emulator.
Once installation is complete, you can launch the emulator to get started!
Step 3: Sign In and Sync Your Account
When you launch the emulator for the first time, you’ll be prompted to sign in with your Google Account. This is an important step, as it ensures that your existing app data, in-app purchases, and game progress are all synced. With your Google account connected, the emulator will feel like an extension of your Android device.
Step 4: Explore the Emulator Interface
The Google Play Games emulator is fully optimized for gaming, so the interface is streamlined to focus on the essentials. Here’s a quick overview:
- Swipe up with your mouse to open the app drawer, where you can access your apps.
- The emulator comes preloaded with essential apps like the Chrome browser, a file manager, and of course, the Google Play Store.
Within the Settings app, you’ll see that the emulator is running the latest version of Android—Android 14. This ensures you’re using a current and efficient environment for your apps and games.
Step 5: Install Android Games from the Play Store
Now comes the fun part—installing your favorite Android games! Here’s how:
- Open the Google Play Store within the emulator.
- Since the emulator is geared towards gaming, the store will primarily feature Android games.
- Browse the library, select the game you want to play, and click Install.
- Once installed, you can use your mouse and keyboard to control the game, just like you would on a console or PC.
As you can see, the games run smoothly, offering a gaming experience akin to a dedicated gaming console—only now on your PC!
Step 6: Sideload Android Apps
What if you want to use Android productivity apps, like messaging apps or other tools, on your PC? Don’t worry—sideloading APKs is possible! Here’s how you can do it:
- Enable USB Debugging:
- Open the Settings app in the emulator.
- Go to the System tab and enable USB Debugging under Developer Options.
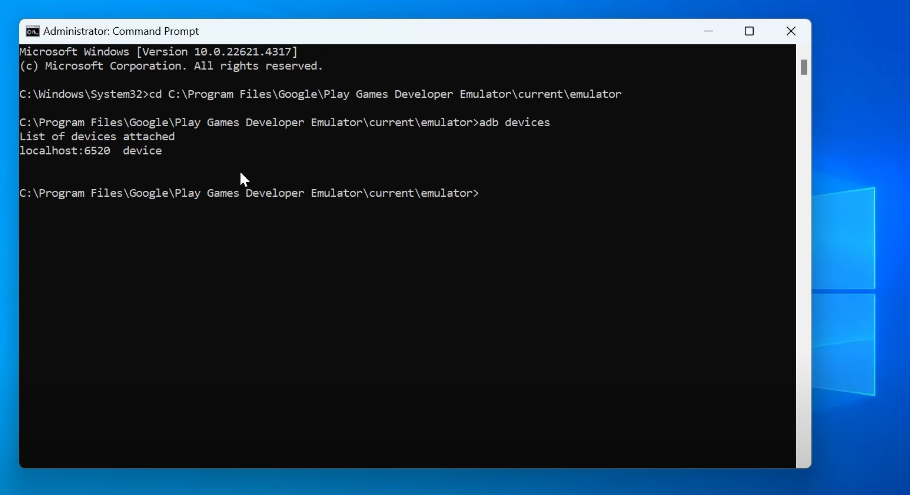
- Locate the Emulator’s Installation Folder:
- Navigate to the folder where the emulator is installed. The ADB executable file is located here. Copy the path from the address bar.
- Open Command Prompt as Administrator:
- In the command prompt, type
CDfollowed by the installation path of the emulator to navigate to the correct folder.
- In the command prompt, type
- Verify Connection:
- Type
ADB devicesand press Enter. This command will verify that the emulator is connected.
- Type
- Download Your APK:
- Download the APK file for your favorite Android app from a reliable source. For example, let’s say you want to install Telegram.
- Install the APK:
- In the command prompt, type
ADB installfollowed by the location of the APK file you downloaded. Press Enter.
- In the command prompt, type
- App Installation:
- Once the installation is complete, you should see a success message. Your app will now be installed on the emulator and ready to use.
Step 7: Enjoy the Best of Both Worlds
Now that you’ve installed both games and productivity apps on your PC using the Google Play Games emulator, you can enjoy the best of both worlds. Whether you’re gaming or using your favorite Android apps, this setup gives you the power and flexibility of a PC with the versatility of Android.
Conclusion
With Google’s official Android emulator, Google Play Games, you can now bring the Android experience to your desktop. From playing games with smooth controls to using essential apps on a larger screen, this setup enhances your productivity and entertainment. Whether you’re a gamer or just someone who wants access to Android apps on a bigger screen, this guide has shown you how to make the most out of your PC while enjoying the variety Android offers. Happy exploring!